|
http://www.ozvalveamps.org/abcdbox.html | Created: 7/11/06 | Last update:
2021/05/18
<<< OzValveAmps |
Multi-way switching for effects boxes.
![]() Caution: (Oct '06) At this stage the following exists only on paper and is not yet a prototyped, tested and finialised design but a work in progress and as such may contain significant errors.
Caution: (Oct '06) At this stage the following exists only on paper and is not yet a prototyped, tested and finialised design but a work in progress and as such may contain significant errors.
That said, there are more than a few circuits around in magazines and on the net that clearly won't work as published, yet claim at least implicitly to be tried and tested. But if magazines such as Elektor think it's useful to publish up-front concept articles, why can't I?
This is one for the intrepid guitarist or keyboardist who has been craving a multi-way A/B/C/D/E... stomp switch, but who can't find or afford exactly what they want, and who doesn't mind a bit of pioneer tinkering to get one.
As always, all comments are welcome.
|
At its simplest an A/B box is simply a two-position stomp switch in a case with some connectors. These simply switch a common socket between two other sockets A and B - no rocket science here.
Inspiration
The ideas below were inspired by an exchange on Aussie Guitar Gear Heads...
ViPER
A/B/C/D switcher?
on: October 17, 2006, 04:00:28 AMI know you can make/buy an a/b switcher, but can you get a 4 channel version, with in and outs, so you can switch between the 4 in/outs.
This way you could run effects pedals and immediatly switch between pedals without having to turn one pedal on and then the other off.
(later)http://www.loop-master.com/catalog/product_info.php?cPath=21&products_id=107
Thats pretty much what I want, except I would want the 3 loops to be exclusive, eg you turn one on and the other one turns off, so you can switch from say loop 1 to loop 2 instantly.
If anyone can make one of these for me i would be interested, or even point me in the direction of a kit would be even better.
Spittin Blood
I have been looking for something like that for a while
I dont think there is anything that has isolated looping at a press of a button. A/B's can do it but not with more than two loops
Of course you could just daisy-chain two or more A/B switches, but having to manually (piedally?) de-select unwanted channels would mean even more dancing about than just plain stomps, and that's exactly what we would like to minimise.
So it got me thinking...
Theme
The action we want is like the “piano-keys” on tape players and older car radios, press a new one and the previous one resets. Trouble is, this is done using a mechanical reset bar running across the tops of the keys, and pressing a new one released all the others.
It's not that we can't do it electronically; it's more a question of which way?
These days the answer to everything is programme a PIC, and for production that would be compelling. But for ease of one-off home construction a design that only uses few common cheap bits is more likely to produce a local result.
So we need a circuit for a “cell” that when prodded will turn on its channel, and reset all the others.
After doodling a couple of ideas using relays only, then a quad op-amp latch, I came back to the humble 555 “timer”. I'm sure there are many methods that will work, but the 555 has a couple of helpful features.
The basic trigger required is only a momentary-contact push button to ground with a pullup resistor.
Signal switching
We have five signal sockets, Common, A, B, C, and D. The switcher connects the Common socket with one, only, of the other four.
Since LDR's, like relay contacts, are bi-directional the switch can either be used “forwards” to select which of four sources is fed to the amplifier, or “backwards” selecting which amp, channel, tuner, or effects chain receives the signal from a single guitar.
We can switch the signal path electronically with FET's or switch IC's; relays give total isolation between control and signal but even tiny ones (e.g. SY-4032 p98) are a bit power-greedy for 9 volt battery operation.[but see also addendum, below] A LED and LDR also offers good isolation as well as low power operation and soft switching in the audio path, and freedom from distortion.
High Intensity LED's greatly reduce the current required to operate the opto-switch.
Channel indication
You really do need to know what is selected, so LED indicators next to each footswitch are a must. We can get high-intensity LED's in a range of colours that light brightly on only a milliamp of current.
So you may as well have each channel colour-coded so you can see at a glance what your multiway setting is from across the stage.
Power
If we can't avoid having a power supply at all, then it needs to run on both the muso-standard 9 volt battery, and DC plugpacks from 9 to 12 volts.
The 555
No, not another triple-five primer. Looking at the 555 only as a “timer” tends to hide some of the useful basic features of the 555 as a more general function block.
The 555 can be considered as an analogue-to-digital interface block, a sensor, a latch, and a power driver.
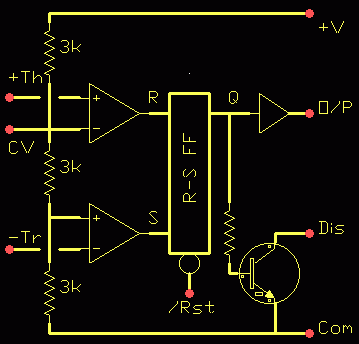
On the left we have two comparitors biassed to 1/3Vcc and 2/3Vcc, and these set the switching thresholds for each of these fairly high impedance analogue inputs.
In the middle we have a digital latch called a R-S Flipflop, for its Reset-Set storage action - a bi-stable.
And on the right we have power buffers for a couple of uses.
-Rst - (not) Reset Master reset for the flip-flop, active low, forces outputs low.
VC - Voltage Control The main use for this point is to connect a bypass capacitor to ground to improve noise immunity. Not used here.
-Tr - (not) Analogue Trigger (not) The main triggering input at 1/3Vcc falling. While low this input dominates everything except -Rst, holding O/P high.
+Th - Analogue Threshold Resets flip-flop when above 2/3Vcc.
O/P - Output Power driver +/-200mA.
Dis - Discharge Current-limited open-collector, mimics O/P. Not used here.
For this application we will make use of a couple of the above characteristics, the dominance of -Trigger over the output, and the dominance of -Rst over everything.
And all this for less than a buck!
Scheme
Here we have four 555's cross-connected so that if one of them is set it forces all the others to reset. This will be the electronic equivalent of the mechanical resetting bar.
Our foot prompt causes its associated latch to set, thus forcing the others to reset. We can do this by connecting each output to the threshold inputs of the other three 555's via isolating diodes. These diodes actually form simple three-input OR gates using diode-resistor logic.
The truth table is;
reset when A B or C or D or power-up B A or C or D C A or B or D D A or B or C
Circuit
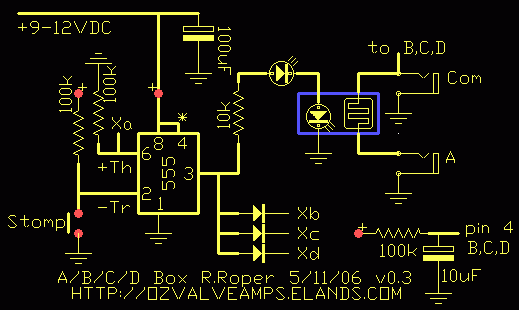
* pin 4 is only connected to pin 8 on channel A. All other channel pins 4 are connected to the power-on reset circuit, bottom-right. This should cause the switcher to default select channel A on power-up.
When the stomp is pressed it pulls -Trigger low causing the 555 to trigger and take its output high. This causes the two LED's to light, one the indicator, the other shining on the channel LDR which responds by dropping its resistance from a few megohms to only a few hundred ohms.
Each of the diode points Xa, Xb, Xc, and Xd connect to pin 6 on the respective channels. Because each of the outputs has to go to all the other cells, everything is connected to everything, the outputs are bussed A, B, C, D across the middle of the layout. Note carefully the progressive connection of the 555 outputs, diodes, and opto LED's to this buss.
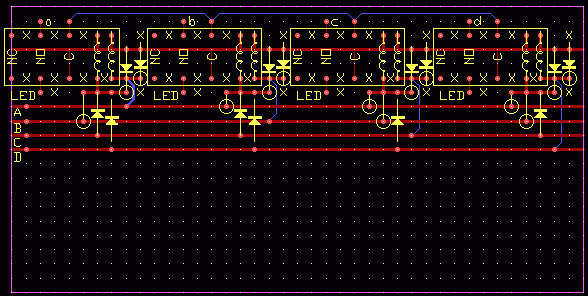
Layout
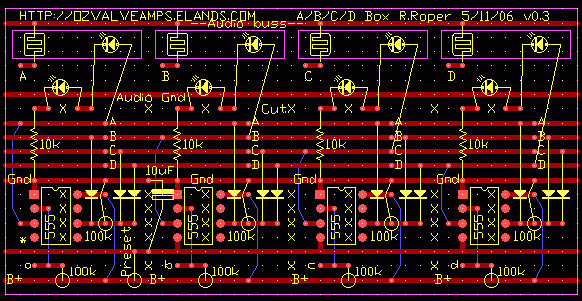
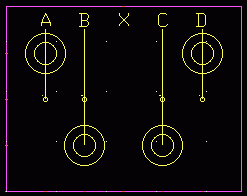
Top/component-side view, 4.0 x 2.0 inches. “X” = cut strip.Notes
* pin 4 is only connected to pin 8 on channel A.
This layout is aimed at stripboard, but dab-board or even plain matrix with fine wire such as wire-wrap wire, should work fine. I use bulk Molex pin-strip for IC's, but quality double-wipe sockets are fine if you don't feel like soldering the IC right in. Poor quality sockets are literally more trouble than they are worth.
A cap of around 0.1uF should be connected between pins 1 and 8, ground and Vcc, on each 555 on the underside. A cap of 100uF or more should also be placed across the supply.
Power switching can be done by using a socket with an isolated switch contact for the “Common” audio connector; e.g. Jaycar PS-0182.
The opto-switches can be made up out of the LDR and LED face-to-face in short lengths of thick light-proof heatshrink tubing.
A metal box is best for shielding your low-level signals (and being jumped on!), but if used you also need to make a cardboard insulator tray to go under the board to prevent shorts.
Variations
Can I have more channels?
The most obvious variation is to have fewer or more channels.
This should be simply a matter of adding extra cells and their diode inter-connects. I can't see any obvious reason why this scheme can't be extended to 10 or even more channels if desired (only what you are going to put it in).
What about the CMOS 555, or duals (556)?
The CMOS 555 (7555) should drop right in with some considerable power saving (from 10mA per stage to 0.4mA per cell). Note that its output current source capacity is a lot less at only 10mA against 200mA (but should be more than enough unless you are trying to do effects lighting with your stomps ;). If you are intending to run the selector from a 9 volt battery rather than a plugpack then the CMOS version is worth serious consideration.
If you've got duals (556's) you want to use up, then fine; but you would normally only want to cram things up and minimise parts count for production, and for production I'd use a PIC and save most of the components and soldered joints.
One measure of the “quality” of an electronic design is the number of soldered joints - the fewer the better. That's why a PIC tends to win hands down for most applications.
There may also be much lurkier ways of doing the same thing, say using a buss latch from an old XT 'puter, that I'd think on first - use your head to save your posterior.
Potential problems
Firstly there is no bypassing shown on the power lines. That doesn't mean it doesn't need it! Triple-5's are rather prone to spurious triggering on external spikes so a cap across the power pins of each 555 is a good idea. 0.1uF should do it.
You also need low-frequency bypassing, so a single 100uF across the power somewhere will also be needed.
You may need to tie the -Rst pin of the channel A 555 to +Vcc to stop false resetting, but this is not normally a problem.
All four switch inputs are currently wide open to induced spikes, so a small cap such as 0.047uF across each trigger switch may be required for stable operation.
How are the sockets, buttons, board and battery (or power connector) going to physically co-exist in the case?
And of course any small power diode (e.g. EM40x, 1N400x, etc) between the supply and everything else to protect you against that “oops!” moment.
Packaging
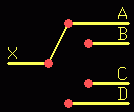
Here is a suggested front-panel layout for the four push-buttons and LED's. They are staggered two-up, two-down, to make them easier to get your foot on. To put them in line would require a much longer box.
Suggested components
The part numbers are from Jaycar, but only 'cause I have their catalogue to hand.
Estimated parts cost: ~$A40, as always the case, buttons, and sockets being the major expense.
Die-cast ali box HB-5067 119 x 93.5 x 34 (p49)
Pushbutton footswitch SP-0755 (metal, great and tough-looking, but can it be foot operated okay?), or SP-0700 (plastic, looks easy to operate, but is it tough enough for a stomp? p91)
LDR's RD-3480 (this may require some expermentation - in the first instance choose the LDR that goes to the lowest resistance in light, hundreds rather than thousands of ohms if possible).
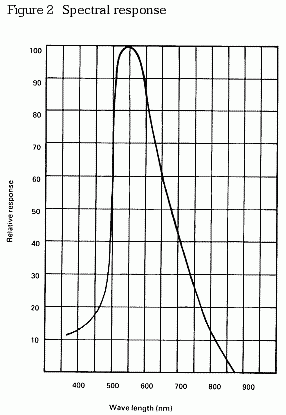
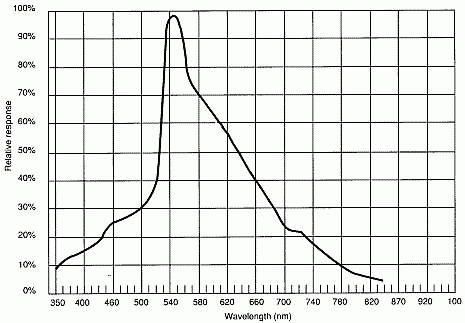
Here are a couple of LDR spectral responses from the RadioSpares catalog. Cadmium-Suphide (CdS) LDR's have a spectral response similar to the human eye and these curves tell us that LDR's are most sensitive to light between 540 and 560 nanometer wavelength, yellow to orange. Brute force doesn't work here. You can get some very bright infra-red LED's, but a LDR can't see them, no matter how bright, any more than you can.
LED's (all 5mm)
Opto's ZD-0284 (yellow, 585nm, 30Cd, $4ea), or ZD-0194 white (10Cd, $2ea)
(indicators, closest to 10Cd)
Colour Wavelength Part# Red 625nm ZD-0156 Yellow 590nm ZD-0166 Green 525nm ZD-0176, or ZD-0174 Blue 470nm ZD-0281 The resistor values have been chosen to keep battery current drain low, but they are not critical and can be varied quite a bit if you want to spread the load on your resistor stocks, rather than use up all your 100k's on one project.
The pull-up on the stomp switch could be reduced very significantly down to say 10k, particularly if there are false triggering problems.
I wouldn't reduce the 100k's on the +Threshold points, Xx, since they are effectively in parallel.
The 10k in series with the output LED's could also be reduced quite a lot if you really want the indicators to sock you in the eye. You could also try this if the LDR's don't fully saturate, BUT, I'd first look for a better LDR, then a brighter LED around 550nm, yellow to green.
The diodes can be just about any silicon diode, but normally in this sort of application you would use a signal diode such as a 1N914, or anything similar. Any diodes you have a bag of that aren't leaky on your DVM should suit.
...you have a different idea.
New: 9/11/06Revisiting relays, there is a way of doing the same thing without any electronics at all, if you use a special latching relay.
This is a latching relay SY-4060 from Jaycar with two coils, one to set, the other to reset, and requires no power in either state, only to change state.
These relays incorporate a small fixed magnet which isn't strong enough to pull the relay in, but strong enough to hold it firmly once pulled in. The two coils are arranged to assist (set) and oppose (reset) this small magnet.
So here is an electro-mechanical version of the same thing. The downsides are that these special relays cost $A10 a pop, and may be dropped at any time leaving your selector unrepairable in the future.
It also means the component cost will be $60-70.
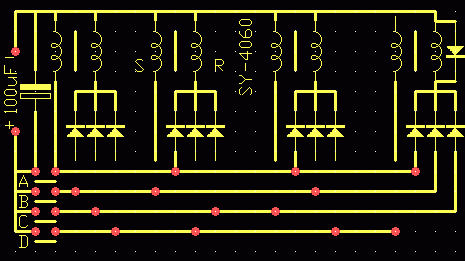
Note: all coils fitted with catch diodes (like top right)The general concept is very similar to the 555 version above, except in this case we have special dual-coil relays to store the current state, and we switch the indicator LED's and audio signal with actual contacts (which are in some ways superior to LDR's, see Pete's Stomp).
Each channel set coil is connected directly to its associated foot-button, A, B, C, and D, and indirectly to the reset coils of all the other relays via diodes. So when pressed each foot-button supplies power to operate four coils, one set and three reset. I'd use small 1N4000-series power diodes simply because I've got a belt of 100 to hand, but again just about any working diodes will do.
The catalogue relay data is minimal but we can work out a few things from it. The nominal voltage is 12 volts, and the nominal coil power is given as 360mW, minimum power 180mW.
From these we can find the coil current and resistance;
P = E I, so I = 360/12 = 30 mA, and...
R = E/I, so R = 12/30 = 400 ohms.
The minimum operating voltage is 6 volts, so a 9 volt battery supply should be sufficient (but see below).
Small circles are diodes mounted on-end. The bands on the diodes between the relays should be down, while all the others should be up, as per the circuit.This could be built on strip-board, but there are awkward breaks required between two of the relay coil pins, so “Dab” or “donut” board would be easier. (yer, the A relay does overhang the end of the 4-inch board ... so?)
The audio signals come from the Common socket to the top line buss (blue) and is switched by the upper sets of relay contacts to the associated connector a, b, c, or d.
Ground/battery negative runs across the board under the relays, while battery positive is fed to A, B, C, or D from the respective foot-button.
The channel indicator LED's are switched to ground via the lower sets of contacts.
There is heaps of free area for use as tie points, and we also need the 4k7 limiter for the LED circuit.
While this should work fine from a fresh 9 volt battery, it may struggle when the battery gets a bit old and high resistance, and unable to deliver a pulse of 4 x 30mA = 120mA.
So to extend the operational battery life an electrolytic cap of between say 100uF and 1000uF (12-16V) across the battery supply will provide the required surge current from a weak battery.
Yes, you could get four more channels on the board, but you won't get four more buttons or sockets in the case.
If you do want more channels the casing will be the main problem, and I'd be inclined to browse the hardware for what's available in ali channel sections.
Perhaps you have some ideas of your own you would like to add here.
|
|