|
http://www.ozvalveamps.org/faultfinding.html | Created: 27/10/06 | Last update:
03:05 04/01/07
<<< OzValveAmps |
You are presented with a dead amp. How do you go about fixing it?
Contains:
|
Let's assume that you are presented with a pretty conventional valve guitar amp of some sort that has some problem. How do you go about finding the fault and fixing it?
You have a couple of things going for you from the start. Most valve amps, and classic period Aussie guitar amps in particular, are pretty generic and non-critical.
They consist of a series of function blocks strung together, preamp, tonestack, phase splitter, output stage, and of course the power supply. The order of the blocks in the signal chain may vary a bit, but within each of the blocks you don't get a lot of variation.
The three blocks where there is a fair variation, inputs, tonestack, and phase splitter, are also the blocks that give the least trouble; while output stages, power supplies, and preamps have the least variation but are the seat of most problems.
They also tend to be rather more forgiving of errors than solid-state amps.
The first thing you need to know is any story that comes with the amp. What is the problem being complained of? How did this come to attention? Did it fall out of the truck, go “bang” at first switch on, suddenly go quiet in the middle of a number, or what?
This can lead in all sorts of directions - crackly controls, dead reverb, bad hum, loud blurts and “blasting”, fireworks, or “just stopped”.
These stories range from astute observations that practically puts your soldering iron on the problem, through mis-diagnosis of a failed stomp or guitar lead, to total bulldust to cover something stupid. Listen carefully to the story, but don't take it too much to heart - it may be spot-on and very useful, or it may be a big fat red herring.
The story is all very well, but the gear itself is the fact of the matter and you need to give the amp itself a good inspection and a chance to tell you it's side of the story before you come to any firm conclusions.
One of the first things you may notice when you stick your nose in the back of an amp is the smell. Often your first clue to fireworks, and in what, comes from smell. You can sniff the residue of burning. After a while you get to recognise and associate particular smells.
Burnt tranny often smells like roadmaking with a touch of burn paint and paper, and strong. Resistors can smell like burnt paint. Semiconductors can be quite acrid, while the normal burning dust is musty like a heater being used for the first time after summer (and normally nothing to panic about).
Unless it is something really obvious and simple such as a valve fallen out or one of the reverb line connectors knocked out while putting the mains lead in the back, it is wise not to try and do a repair with the owner present.
Particularly if it is an informal job for a mate of a mate, make sure you get the owners details so you can contact them directly for when the job is done, or something expensive or impossible comes up.
Where fuses were fitted at all they were almost always the 3AG-style glass cartrage fuse, about an inch by a 1/4 (25 x 5mm). In imported gear you will encounter the smaller M205-style, often sand-filled.
As we'll see below, it is possible for an open fuse to be innocent, but an obviously blown fuse is normally the symptom of a problem, not the problem itself. So it is not wise to simply bang another fuse in, and power up to see what happens.
There should be no need to to warn against the temptation at a gig of getting a fuse out of the car and trying that. There shouldn't be, but people keep doing it. The normal result of replacing a 350mA HT fuse with a 35 amp headlight one is to cause even more serious damage and possibly total the amplifier altogether by smoking one or both of the trannies. This is much more likely to get you deeper in trouble, than out of it.
As a general guide 3AG cartrage fuses blow in three characteristic ways.
Failure
Fuses are components too, and they have a lifetime and fail just like anything else.
Where there is no other apparent problem a fuse with a sag in the wire and a tiny, sometimes invisable, gap can be assumed to have simply fractured and failed due to normal heat-cycling. You should always check visually “good” light-duty wire fuses with a meter because it's not unknown for them to blow where you can't see inside one of the end caps.
Holding the fuse at one end and flicking the other can sometimes make the two ends of an invisable break twang obviously apart like tuning forks to show it is not actually intact.
This is the only situation where, in an emergency, it is worth trying another fuse of the correct rating (which you are naturally carrying in your gig bag). If it blows too, then it is telling you something. Don't try a third.
Light overload
With a light overload the fuse may blow gently, the ends of the wire forming little blobs back from the break. The bigger the blobs and gap, the heavier the overload.
There is no point in replacing this until you have found the cause.
Heavy overload
Then you get a fuse with lots of little blobs rolling around inside which is the fusewire blown to bits, or silvered to some extent, possibly totally so you can't even see inside.
This silvering is caused by a really heavy overload such as a mains short, and the fusewire has expoded and is now spread over the inside of the glass tube.
In this case it is imperative that you find the cause before replacing the fuse and reapplying power. And when you do it's a good idea to initially do so via your trusty power limiting light globe.
So at this stage, with the owner out of the way, it's out with the chassis and up on the bench.
This first requires that all the leads to the chassis be free. Depending on the features and style there may be a clamp for the mains lead to the cabinet, leads to the reverb line or tank, and leads to the speaker.
Reverb lines generally connect at each end with an RCA-type plug. You should make a written note which plug goes to which end. The speaker may unplug at the chassis, have spade connectors at the speaker, or may have to be unsoldered somewhere.
It's also a good idea to mark the output valve bases and chassis with their location, and remove them and put them safely to one side while you are actually removing the chassis.
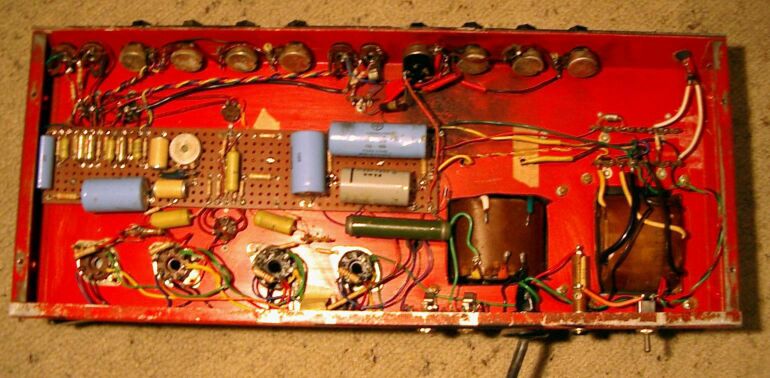
Your best service instrument are your eyes, so take a good, long, hard look all over.
Very often you will find stuff that is obvious such as burned resistors (but why?), broken wires and components, heat-damaged output valves, white getters, exploded electrolytic caps, or bloody great splat marks where the loose mains switch has rotated and touched the chassis.
The soot tells us this has been subject to a blowup at some point. Since the mains switch is on the back curtain (bottom far right) I surmise that the switchpot on the volume is standby with main HT on it. The soot, surrounding heat damaged wires repaired with red sleeving, and the bright shiny new replacement switchpot tell the rest of the story here. (more)
You will quite often find other faults not even related to the current problem. It stopped, but they don't mention that the pilot light or reverb have not been working for years, or some other querk that have simply got used to.
The basic reason is to orient yourself, to identify each of the stages and the flows of power and signal.
In a solid state amp you are also looking for clues as to the devices used, BJT's, Darlingtons, or FET's, and in which of the several common arrangements, full or quasi-complementary, common emitter or collector, and so forth.
With a valve amp there isn't much variation, so the main points are what sort of power supply, bi-phase, bridge, or doubler?
Cathode or fixed bias, and the screen power arrangements? Very often amps with EL34/6CA7's will have distressed screen resistors as failing bottles will often give them a hard time by shorting internally and so on.
Which type of phase inverter?
Like fuses, resistors can also either do a slow cook or a flash in the pan. When a resistor has been cooking for a long time there is often quite obvious heat damage to its surroundings such as darkened insulation and disorted or melted plastic cap sleeves.
A resistor that has burned up due to a sudden situation such as the shorting of another component will show signs of extreme but very localised heating. It may have got white hot, but not for long enough to effect anything nearby. Sometimes burning components, particularly plastic ones, will leave a smoke/soot trail on their surrounding that point back to the source.
During this process of close inspection I literally poke about a lot. This is when the resistor sheds its endcap, breaks in half, or crumbles under your finger, where the fractured lead at the end of the small electro shows itself, or a wire wiggles in a terminal showing up a dry jount. Are all the components and wire connections sound and secure?
This is when your powers of observation come into full play - you are looking for clues. You also need to keep in mind that the primary fault may have caused some secondary damage as well, such as an obviously failed output valve which has also damaged it's screen supply through overload while it was failing.
A few tests with the ohm meter are also in order. Are any of the power supply diodes shorted? Does the HT line seem to charge up, or stubbornly remain at zero?
If we haven't found anything obvious the next thing is to try power the amp up for some hot diagnosis.
Before you do there are two steps you must not skip. Take the back off the mains plug and check that the connections are both correct and tight and secure.
An important check is for very low resistance between the plug earth pin and the amp chassis (dead short hopefully). This is not only to save your skin, but to save your time later tracking crackles to a loose mains plug.
Run your hand along the whole mains lead. Does that wrap of gaffer hide where it melted against a light one night? If it's damaged, or the old rubber-insulated “cabtyre” type, it must be replaced before any power tests.
The other critial point with a valve amp is that you must have a load connected to the output stage, either the bench dummy load, or its normal speaker. But if you use the speaker, check that it's intact first. When you clip your ohm meter across the speaker(s) they should all make a click or thump. With it connected gently but firmly push the cone(s) forward. The reading may wander a little but should remain pretty steady.
Sudden changes, or a speaker suddenly acting like a buzzer, suggest an intermittant, and if the speaker isn't “polling” (the voicecoil scraping in the gap) then one of the braids from the tagstrip to the cone may have frayed open. This can often be fixed with a quick touch of solder.
Do not connect your load with clipleads. These are too prone to suddenly jump off without warning. Plug your load in, or take the trouble to solder its connections if required. Since some amps have oddball, or no, speaker connectors I have a 6.5mm socket with two flying leads for just this situation.
If the speaker(s) seems damaged, scraping or in any way dubious, don't trust it as a load. It isn't worth risking the wellbeing of the output transformer.

Depending on the nature of the fault you may wish to initially power up via your trusty limiting globe. With solid-state amps in particular this is a wise precaution. Otherwise you can gingerly switch on for a second or two with your multimeter clipped to the main HT rail (set to a sufficient range!).
A magnetising “bump” from the tranny is normal, but a continuing growl can be a protest at an overload or a short.
Your load-limiting lamp should flash while the main caps charge, then dim right down. Your multimeter should jump to full HT volts, then drift down quite slowly after you switch off again. A low voltage pilot lamp should also light up some, showing that power is at least getting to the power tranny, and you may notice the preamp heaters flare white.
Note: I am assuming here an amp that has been in regular use and failed only days before. If the amp has been out of service for some months the load-limiting lamp is a really good idea, and start out with a small one like 15 watts. If it has been out of use for a year or more then you need to go through the process of forming up the electrolytic caps.
If the HT doesn't come up at all (and there are no signs of distress) then we have and open of some sort back towards the power supply. (or your multimeter isn't properly hooked on - careful, there may actually be a lot of HT stored there).
If the amp has a negative bias supply this should also be checked early before you allow the valves to heat up and run without bias (but bias supply failure is generally pretty obvious because it normally causes a major cookup of the whole output stage, valves and tranny).
If all seems okay, the HT has only decayed very slowly as you watch over tens of seconds, then you can risk putting a fat globe in your limiter, and applying power for longer; let the valves heat up and see if anything eventuates, being ready to turn off at the first sight, sound, or smell of distress.
Assuming the amp settles like this, you can remove your load limiter and we can get serious.
You should look for a blue blush inside the glass of the output valves. This is a good sign that tells us we have HT, that the valve has cathode emission, and that its voltages are about right.
Output valves crinkle as they warm up as the expanding structure slides up the glass a bit, but that should quickly settle down. Keep a close eye on the anodes for any red heat, and turn off if you see any.
At this point we have an amp which is powered up without smoke, but still no signals either.
The classic point to start with a radio or amplifier is the main volume control because this is normally near the mid-point of the signal chain and allows us to cut our problem in half - is it before, or after the volume control?
Here we have two options, signal tracing, or signal injection.
You can either inject a signal in the input from a sig gen, radio or tape player into the front end and trace how far it gets.
The best tool for this is a CRO, but signal tracers exist which are no more than an audio amp and speaker with a pot in front to reduce high levels. Take a self-powered computer speaker, add a pot and blocking cap, and you've got a signal tracer.
Or you can work from output to input injecting a signal at each stage until you find the one that won't.
Again you can use a signal generator, but this is where the term “wet finger test” originated, from going along an old amp or radio sticking your finger on each grid topcap in turn to isolate the dead stage. Then anodes started appearing on topcaps and it got interesting.
But as you poke about with your multimeter/DVM along the signal chain you will notice that probing some points produces a reaction in your monitor speaker. While this is very rough it can actually tell you a lot as you probe from anode to grid of each stage and hear the senstivity increase (or not).
At some point, hopefully, you will find a stage where the signal goes in but doesn't come out the other side. First check the obvious. Is it lighting up? Both sides of a twin tube? Is it loose in in its socket? Do you get almightly crackles when you poke it?
Now as a rule of thumb you can expect a volt or two on the cathode, nothing on the grid, and roughly half the local supply on the anode (excepting transformer-coupled output stages such as a reverb driver, then the anodes will be close to their HT).
If there is something on the grid then the most likely source is leakage through the coupling capacitor from the preceding stage and it should be replaced with one of your favorite colour. Otherwise a suitable rating Greencap polyester will do.
If the anode is high, almost supply, then the valve isn't drawing any current.
If it's low, it's drawing too much (or the anode load resistor has gone high).
We can check by looking at the cathode voltage. Resistors can go either high or low, but high is much more common. Similarly caps can go low, leaky or short, or high or open to a much smaller value. Coupling caps tend to go leaky while electrolytics can go leaky or short, but drying out and very low in capacitance is more common.
If you have a high cathode voltage you don't have a shorted cathode bypass cap, and most likely have too much current (unlikely), but low may be due to either too little current or a leaky or shorted bypass, suggested by low anode volts and little or no cathode volts.
Be aware that some tonestacks such as the much-copied Fender three-knob will pass very little signal at all if all the controls are at 0, so remember to set any tone controls for mid-point (I nearly said flat, ho ho) during your tests. In amps with both a gain and a master volume controls forgetting to set the master off zero can also be a trap where you fool yourself and chase your own tail.
One tip for trying to make sense of stage symptoms is to trace the circuit including the voltages you find. This often breaks a mental logjam for me because the process of drawing it out can expose your misunderstanding of what is going on.
Within the amp these are caused by old valve holders that are dirty and weak, and by scratchy pots.
A scratchy pot in a tonestack often gets overlooked because it isn't obvious, but it can still be a mysterious gremlin for a guitarist where the set amp tone isn't stable. It's often clear that something is wrong, but often not what exactly. These can more easily be checked for smooth operation using complex programme from a radio, CD, or somesuch than strumming a guitar.
In the first instance dirty pots can be cleaned with a few drops of metho, or a pressure-pack can of some instant technician (just make sure that it really is a contact cleaner and not moisture repellant, engine starter, or some such). Don't over-do it. Too much solvent and you risk mobilising the grease in the pot shaft bearing, and we don't want that.
Results vary a lot. Some pots come right back, other leave no option than to replace them. If it doesn't quickly come good with a couple of operations end-to-end then it's probably worn out.
Preamp valve sockets are a particular problem area. They seem to oxidise and to lose their tension and grip on the valve pin.
The quick fix at the gig is to gently rock the valve in a circular motion so all the pins scrub on their connectors.
On the bench a wash with metho or contact cleaner can help. You can re-tension the contacts by gently driving a sewing needle down the outside of each contact slot, so bending the leaf back towards the pin.
I'm told that there is also some specific goo that does a good job of renewing these contact, but I have no experience of it.
Replacing a socket is a pain, but that and a new valve are a sure way of getting rid of socket crackles.
Another common valve amp problem is valve microphonics. This is where a valve, generally a preamp, has become sensitive to vibration. It's rarer in power valves but I have had very sensitive output valves that have produced screaming audio feedback. Microphonics usually has a characteristic sleigh bells sound of jingles when the amp it tapped or thumped.
And this is the best way to localise it and find which valve exactly is doing it. Tapping lightly around the chassis will quickly lead you to it, and tapping lightly on the glass with something like a pencil can confirm a jangly valve. The cure is replacement, although some may still give useful service in less critical parts of the circuit such as the phase-splitter or tremolo oscillator.
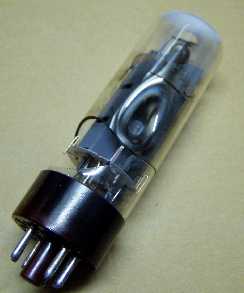
Output valves
Unlike preamp valves that can go on for decades, power valves used in the output stage have an exciting and short life and are prone to major blowups.
When you have a fault of any sort it is important to know what the basic cause is, so there is no point in replacing a melted output pair if they melted because the bias supply has failed.
Similarly fuses do sometimes blow for no reason other then they have had enough. But mostly they blow because something else has gone wrong and they are just doing their job.
Musicians don't like to face it, but output valves wear out like car tyres. Depending on how an amp is handled and driven they can last for months to years. When one of a set is worn out, then the whole set is worn out.
This gets difficult when one gets broken mid-life. Unless they are known to be reasonably fresh it is best to replace them as a set.
Valves that are worn out can normally still produce low power levels, but either choke, or rapidly run out of steam when asked to produce sustained power. If you have a CRO then early output stage clipping is one sign of lost cathode emission.
Serious imbalance between the half-cycles suggests a weak valve on one side. This can be confirmed by swapping the valves and seeing if the weakness changes sides.
|
|