http://www.ozvalveamps.org/plugpacks.html | Created: 30/10/06 | Last update:
16:06 03/01/07
<<< OzValveAmps
|
Plugpacks - for musicians
I get a lot of questions from confused musicians about their plugpacks, so here is a bit of rundown of the main points, and some repair tips.
Contains:
- AC
- DC
- Voltage
- Current - mA
- Unregulated
- Regulated
- Connectors
- Universal
- Protection
- Repair
- Opening
- Inside
- Closing
- Earth
- Isolation
|
Plug packs, also known as “wall worts”, are low voltage power supplies that plug directly into a power outlet. These have become very common over the past couple of decades and turn up powering all manner of musical gear, not least stomp boxes.
Plugpacks come in a wide range of flavours and telling them apart needs a fairly close reading of the lable. This may be a stick-on, or it may be embossed into the plastic case, and it may be obvious on the back, or hidden on the plug side.
The one thing all plugpacks share is that they are double-insulated and not earthed, so normally lack an earth pin on the mains plug.
Another thing most plugpacks also share is the fact that the body significantly overhangs around the plug, meaning that they create difficulties with double outlets and plugboards by making the socket alongside, or both sides, unusable.
It also seems universal that they are all fitted with an internal fuse. We'll take a closer look at this below.
The low voltage side connector is a co-axial type with a ring around the outside and a hole up the middle. That's where any commonality ends. There must be at least ten different sizes, maybe more, and their use is not standardised in any obvious way. Just because it fits does not mean it's right.
If all devices were well protected against using the wrong plugpack there wouldn't be a problem, but many devices that employ plugpacks have little real protection against incorrect power and may well be seriously damaged by using the wrong one.
AC
The most basic type of plugpack consists of just a transformer in the plastic case. These output AC, and not suitable for anything that requires a DC supply.
So the first rule is that you can't substitute an AC plugpack for a DC one.
If an AC plugpack fails then there is generally little prospect of repairing it, unless it is a simple broken lead, since it only contains the transformer which is itself unrepairable.
DC
The majority of plugpacks output DC, just like a battery. This means that they also contain a rectifier and smoothing capacitor.
Voltage
Plugpacks come in a wide range of output voltages, from around 2.5 volts to around 24 volts. You may get away with using one of a slightly lower voltage than intended, such as a 6 volt pack to power a 9 volt stomp, but it is not a good idea to go the other way, such as using a 12 volt unit.
While a lot of gear may actually tolerate such an overvoltage most packs are unregulated and the output voltage rises somewhat above the rated value, and this higher voltage may actually cause damage.
Adjustable
There are “universal” plugpack models that have a voltage switch allowing the selection of a range of voltages, say from 3.5 to 12 volts.
While these seem like a good idea in the shop, in the reality of the band scene it is just too easy for the setting to get changed to something a lot higher than your gear will tolerate.
Since these are typically in a single application and don't need to be changable I'm inclined to open them up and rewire the switch out, turning it into a fixed voltage supply (and clearly mark it so). Gluing the switch in position once set is another way.
So the second rule is that the voltages of the supply and gear must match.
Current - mA
The current rating seem to cause a lot of confusion, and I often seem to be asked if a particular current rating will damage the gear.
The current rating is a measure of the plugpack's ability to deliver. If the voltage is correct it can't force excess current through the device. The actual current drawn depends on the device, not the plugpack.
In fact the current rating of the pack must be equal or more than the current rating of the device being powered or the pack itself will be overloaded.
So the third rule is that the supply current rating must equal or be greater than the demand of the device being powered. A 300mA pack will be happy driving a 200mA load.
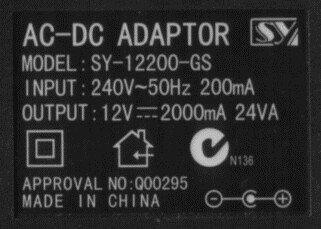
Here is the lable on the supply for one of my synths.
With this one the top line happens to tell us this is a rectifying or DC supply, but they are not always so obvious.
The next line of interest is the input. This tells us the supply is intended to work from 240 volt AC (the wavy line) 50 Hertz (cycles-per-second) mains, and at full load will draw 200mA or 0.2A from the mains, which is nothing much. It is possible to encounter packs with privately imported equipment for 110 volts 60Hz, but these would have incompatable plugs to Australian mains outlets (and a pretty short life if you did manage to connect it).
The output line is the most important to us. This shows the output voltage is 12 volts DC (the straight line over a broken line is the Euro-symbol). It shows that the pack can supply up to 2000mA or 2 amps of current at full load, which is quite a lot of capacity for one of these and more typically a tenth of that. And lastly the output power rating in Volt-Amps or watts, which is simply the product of the output voltage and current, 2 amps by 12 volts equals 24 watts.
Under this is the Euro-symbols for double-insulated (a box within a box), a little house and arrow meaning for indoor use only because it's not waterproof, and finally the “C-Tick” approval which is a Euro standards compliance (but something of a meaningless joke because it is self-regulating, often applied to goods that don't even require it, and sometimes applied to goods that clearly don't meet the standard).
In the bottom right is the connector polarity. This is frequently, but not always, marked on the supply and gear because of the lack of connector standardisation (see below). This one shows the positive to the connector inner and negative to the outside ring, and the gear being powered must match.
This may seem obvious, but I have encountered people who apply the logic that since one is a plug and the other a socket, so the polarities should also be opposites.
Unregulated
In packs that are unregulated, which is most of them, it is a good idea to use a pack with an output current rating only a bit in excess of what is required. This is because the voltage varies with the load and falls to the rated value at the rated current.
So the output voltage of a pack with a high current rating will generally be higher with a given load than a pack rated only slightly in excess of the required current.
Regulated
These are normally clearly marked as such, so if it doesn't actually say “regulated” somewhere on the outside, it isn't.
These include some electronics after the rectifier and filter to hold the output voltage down to the specified voltage. They also sometimes include circuitry to limit the available current, which is more about protecting the plugpack than the driven gear.
These supplies deliver the cleanest and most steady power, tightly controled voltage and virtually hum and noise free, however devices (such as stomp boxes) can be assumed to be designed to work correctly with unregulated supplies unless specifically stated otherwise.
Connectors
The fourth rule is that the connector polarity must match.
This is the nub of the plugpack problem, and it's a mess. In a rational world there would be a standard of inner and outer diameters that made it impossible to connect the wrong plugpack to a device, but we apparently don't live in a rational world.
There is a general trend that lower voltages are often on smaller diameter connectors but this is nowhere near constant enough to depend on. Especially if the health of an expensive classic stompbox is on the line.
Frankly, I hate this style of connector with a passion. Apart from the lack of standards and the real risk of the unwary blowing up their valuable gear, they are pretty lousy as connectors, loose-fitting, making poor connection, and prone to simply falling out, particularly with stomp boxes.
But they also get supplied for use with synths and some other gear including rack-mounting units. Most of these will revert to numbat mode if they lose power for even a moment, so just when the hall is really jumpin' your synth suddenly reverts to cheezy piano, or your echo defaults to off.
Gaffer tape, rubber bands, Blu-Tac; I've seen them all, and none are a real solution to the problem of these lousy connectors.
Universal
There are a couple of other forms of universal plugpack that comes with a number of different size DC connectors. One has a selection of connections in a tree at the end, the other comes with a set of adaptors that plug on to a two-pin connector.
The multi-end type have a lot of exposed metal and are therefore prone to accidental shorting. A few bits of heat-shrink tubing over the unused connectors prevents this happening.
Just to make things interesting the adaptor type are reversable so either polarity can be had on the plug end. Get this wrong and you will almost certainly do damage to the powered device or the plugpack.
While there are markings on the parts they can be very hard to read so it's a very good idea to check the polarity is correct with your trusty yellow voltmeter before using it.
Another good idea is that once you have got it right, put a drop of glue between the parts to keep it that way. I personally favor rubber type contact glues since they are effective, but can be torn apart later if needs be without destroying the connectors.
Protection
The use of thermal fuses in plugpacks seem almost universal. These are a two function device actually embedded in the transformer winding, and thus beyond reasonable repair.
They are a convential fuse against too much current such as a short circuit, but they also have a low melting point so they will also open if the transformer overheats on a sustained marginal overload.
This fusing is only to prevent the plugpack itself catching fire, and nothing to do with protecting your valuable stomp box from incorrect connection.
Repair
Leads on plugpacks are pretty fragile and often get wrenched when somebody trips over them. This is one case where repair is a reasonable option.
There is a key test however that you need to do first - measure the continuity of the primary with your multimeter and make sure it is not open circuit.
This is the resistance across the prongs of the mains plug and should measure a few hundred ohms or less. If it measures open circuit then the thermal fuse has blown and there is no point in proceeding. You need a new plugpack of the same type, AC or DC, the same voltage, and at least the same current or power (Volt-Amps or Watts).
Opening
The next question is how do you get inside? From the maker's point of view, you don't. You throw it away and buy a new one.
But if the primary is still intact, and say the lead needs replacing or re-terminating because it has been torn off flush with the side; or there is simply no voltage coming out any more; or it has suddenly developed a savage hum; or the gig is tonight and you can't find a suitable replacement in time; we aren't going to let that stop us having a go, are we?
The case is generally a front plate carrying the plug with a mating cup-cover. The seam may be obvious, or hidden in a decorative molding running around the case.
This will almost always be glued in place, but may also have tooth latches and perhaps one to four screws as well.
If there are screws they will be down wells in the plug side and may also be covered with rubber bungs or wads of plastic or wax. Mostly they will be Philips-head (crosshead) but we are seeing more securi-drive screws in gear these days and these require a special driver head to remove.
As it happens these “security” driver bits can be obtained in mixed sets from just about any $2 shop. But if you're really pressed you can simply drill the screw heads off. Once apart the thread end can be unscrewed with pliers and new screws fitted.
In some of the larger packs, particularly those that have a mains lead and are intended to sit on the floor (e.g. many later keyboards and older console-type computers), there is often a single screw down a well in the middle of the front, cunningly hidden under the stick-on lable. If you run your finger over the lable pressing down hard you can often see near the middle where you have distorted the lable down into the top of the well 5 to 10mm in diameter.
You can either carefully peel the lable off using an art knife or similar (and glue it back when you're done for a neat job), or you can try simply plunging a Philips head down through the lable if you're not so picky.
Unless you are very lucky, even with all the screws out the back generally still won't come off, and here is where we have to apply a bit of measured brute force.
Being sure you have located the seam, place a wide-blade plain screwdriver along the seam in the middle of one of the longer sides, and give it a light whack. When you get it right you will be rewarded by the glue splitting (and not the case).
Repeat on the other side, longest first, and working towards the corners. Once you have a gap most of the way around you have somewhere to stick your screwdriver in and give the top a bit of upward encouragement. If you keep working up into each corner in turn they will eventually give up.
They vary a lot in difficulty depending on how heavy-handed someone in the factory was with the glue gun, but it is normally possible to pop the top off without causing too much damage.
Inside
As the lid comes off everything inside comes loose and tries to fall out, but you need to take note of where the transformer and any other components fit. The tranny is generally captive between lugs molded into the case parts and sometimes padded with sponge or somesuch.
There will also be a bit of thin cardboard material known as “elephant-hide” arranged to form a barrier between the mains and low voltage side. This is part of the safety double-insulation and should be replaced in the same position on reassembly.
In a simple lead replacement you only need to make sure you reconnect the correct leads, one plain, the other with a light trace stripe. Again, there is no polarity convention with these bland grey and white traces, they only allow you to tell the leads apart, or to match them to the bits remaining inside.
Because of the effectiveness of the fusing you seldom find a cook-up, and then confined to the tranny itself. The most common problem is the poor quality of the soldering on the tiny printed circuit that carries the rectifier and smoothing capacitor, and voltage selector switch if fitted.
And the most common failures there are the connections to the electrolytic capacitor which is the most massive component and therefore gives its joints a hard time every time the pack is dropped.
If you wiggle the cap a bit and one of its solder joints moves too, you are looking at your problem; loss of output, excessive hum, or blurts and crackles when the pack is bumped.
Apart from making good any broken connections, if you can, glue this cap down or secure it with a cable tie so it can't move and stress its joints again.
Reassemble the unit including the insulating sheet and any other insulators/spacers, and hold together with a fat rubber band. Now you can give your work a good test, polarity, voltage, and finally function by powering its device.
Closing
If you could get the screws out okay, and they hold the case together sufficiently, say one in each corner, or two in diagonal corners, then you can leave it at that. Some cases however only have a single screw in one corner, or no screws at all.
With these you must re-glue the case for it to stay together. Reassemble the pack fully and make sure the case parts actually close together (you have it the right way around and nothing fouling inside or poking out the seam) before you apply glue. You can then lift the case a little and run a bead of glue around the seam. Replace the case and hold in place with your large rubber band until fully set. Don't overdo the glue - you may want to get it apart again later.
Earth

Most plugpacks only have two mains pins because they depend on double insulation rather than earthing for safety. Around music gear this is actually handy because it removes one more possible source of the dreaded hum and buzz causing earth-loop.
A few pack however have all three mains pins, and the earth is brought into the case but left unconnected. This seems to be found with larger units that might unplug themselves if they weren't held by three prongs.
In case you get the idea of improving the supply by connecting the mains earth, say to DC negative - don't.
Whatever you have in mind, as a guitarist literally holding on to the low voltage side of this circuit, you don't need the potential excitement. Adding a mains ground where one was not intended can be as serious as removing one that is intended.
Isolation
Similarly you must not compromise the isolation between the mains side and the low voltage side, so any bits of card, plastic spacers, or covers found internally must be refitted in the correct places. Remember, it is you who will be holding onto the low voltage side with sweaty hands.
One of the problems with plugpacks in use, particularly larger ones, is that they tend to be un-plugpacks and fall out of the wall socket, power board, or double adaptor they are plugged into. And always at the worst possible moment.
Most extension lead sockets however seem to get a secure grip on the plugpack, so I normally feed my plugpacks using short extension leads from a distribution plugboard.
New: 3/1/06
Stephen Bruce writes;
I have had some subtle problems with power packs on, in my case, Digitech RP50/BP50 and a Boss BR864 (recorder). The packs are both DC: one a regulated switch mode (transformerless), the other trans-former based (don't know if regulated.) On low input signals, the xP50 AND BR864 produce a low level (digital like) noise only on power packs. When on batteries this noise is not present. I put additional electro-caps on the power pack DC wires and the noise is now gone.
These particular DSP controlled devices are definitely sensitive to noisy DC power packs. Maybe other DSP devices will also be sensitive.