Operation
Layout
Construction
Testing
Packaging
Sidebars
Credits
Introduction
We had played a great musicians party at a place right on the beach at Lake Cathie, NSW (“cat-eye” as the locals call it).
One of the guests, Greg, who had ended up playing his heart out with the band at the party returned next morning to the after-party with a small bag of electronic parts.
He had been recording his band Jack Russell using a Minidisk recorder but the stereo mike had failed. A replacement was too expensive so he had bought a pair of electret capsules from one of the electronic chains.
"Just connect them up, it'll be alright" assured the highly skilled young sale consultant.
(Is there an occupation where people don't try to get advice at parties? i.e. “Which valve do I change to get grunge?”)But he seriously wanted my assistance, and I have a bit of a “thing” about bands routinely recording practices and performances and reviewing those recordings as a way of rapidly improving.
Circuit
Since I couldn't get hold of the recorder itself to see if it had phantom microphone power, I decide to take a bit of a shot in the dark and trust to luck.
The circuit is totally conventional for an internally powered electret microphone, except that naturally for stereo there are two of them.
The electret microphone is often sneered at because of its very low price. They are however very flat in their response, and can have a good signal to noise ratio if run from sufficiently high voltage, not just 1.5V as is normally done.
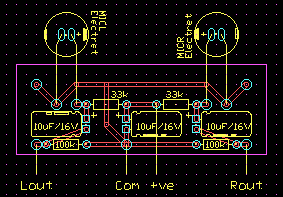
The “wings” are where the mounting screws connect the shield.
The mic capsules contain a FET buffer without a load resistor. In this case the external load is the 33k resistor to the battery supply.
The signal is then coupled to the output while the DC is blocked, by the 1uF/16V cap.
The 100k resistors are to charge up the caps if nothing is connected to the output, preventing a big signal spike when the recorder is connected.
A significant feature not shown in the drawing is that the power from the battery +ve comes through a quality mini toggle switch and a red high intensity (6Cd) LED, in series.
Although the mikes only draws a few hundred microamps, this is enough to clearly light the LED. I love the fact that the LED indicator is running on the actual mike current, that none of the battery power is wasted lighting the power-on indicator.
Despite the microscopic current, Greg remarked that on stage it's almost a bit too obvious, but it has already saved several batteries worth.
You can run this from 1.5V, 3V, 9V, or even higher. As it was possible, I decided on 9 volts.
Reasons for:- much better capsule performance
output rises more quickly than noise for rising voltage - longer battery life
still operates when battery is near-dead - allow the LED indicator
the LED voltage drop is a problem on lower voltages - popular size with musicians
most tuners and stomp boxes use 9V, so most likely available spare in an emergency
- poor value for money
- poor characteristics compared to AA size
- battery clip quality
Operation
Turn it on, plug it in, stick it on the floor in the middle of the band.
If the floor is not solid put it up on a balled-up jumper.
Don't jump on it.
Layout
The circuit layout isn't critical, but it is a low level device and some shielding against outside signals is desirable.
Construction
I selected a remote control case. See packaging, below.
I coated the inside of the case with a rubbery contact cement and glued in a lining of aluminium cooking foil. Or you can use a metal case.
Small holes were drilled in opposite sides of the case near one end to admit sound.
A soft mounting for the capsules themselves was cut out of a high density soft kneeling mat, and glued into the case so each capsule faced its' hole floating in the foam, close but not touching the case.
The power switch, LED and output socket were mounted on the blank window supplied, and fitted in the recessed end they are not only protected, the end product looks pretty neat.
The fact that it doesn't actually look much like a microphone is actually an advantage - performing musos generally don't need to be reminded that the are being recorded while they are playing.
Testing
Like the LED, electrets are polarity sensitive. Trying to power it in reverse may permanently degrade the FET noise figure.
Like the LED, electrets should not be connected to a supply that is not current limited, that is, via a suitable resistor.
First check the electret capsules' polarity, that the case/ground side actually goes to ground/bat -ve.
Be careful of shorts to the shielding foil. (I made an insulating tray from a light filing card to go under the board.)
Give it the smoke test. The LED should light well, but not to full.
Each capsule should have very roughly half the battery voltage across it.
Packaging
The key to this mike is the remote control case. This little wonder shows some real thought. It comes with both matching blank window and a translucent red filter for IR applications.
The battery arrangements are interesting. The well will hold one 9V or 2 AA size and a full set of contact hardware is provided.
This is a very useful and flexable case for many small projects. A belt-pack preamp for acoustic guitar pickups is one idea this case suggests.
Part No: HB-5610 from Jaycar
Sidebars
A few months later I ran into Greg again and he was very happy with the mike in operation.
It has good stereo spread due to the capsules facing in opposite directions. Its noise floor is not an issue as it was with his previous mike.
And he was really impressed with the fidelity of his recordings, their “realism”.
There is an issue with acoustic overload in electrets so I asked him specifically about drum transients.
He said that they mike on the floor in front of the kick drum but hadn't had any problem with the mike “cracking”.
What is an electret?
An electret is a material which has a similar electrostatic behavior to a magnet.
As a magnet can hold its magnetic field indefinitely, so an electret is a material, generally a plastic film, which holds an electric charge on its surface, and therefore maintains an electric field.
Credits
JohnE. for introducing us.